How to: make naturally coloured organic rainbow cake
Today we’ll be making an organic rainbow cake, coloured with all-natural, non-toxic food colours. We’ll top it off with fluffy vanilla icing.
Ample time!
Naturally, the coloured rainbow cake is not a project to do on a whim because the homemade dyes take some time, as does assembling and decorating your cake.
- Make your food dyes: 1-2 hours (you can do this a day ahead of time if you like).
- Mix, bake, assemble and decorate your cake: 2 to 3 hours.
Choose your cake pans
When I make a rainbow cake, I use mini pans, because nothing is cuter than a mini rainbow cake.
I’ve made a mini round rainbow cake using little porcelain ramekins which is a snap. The last time I made a rainbow cake, I wanted a mini square rainbow cake, but don’t have square baking pans, so I used my 9 by 5 inch bread pans, then sliced the layers in half.
You don’t have to make mini cakes though.
This recipe makes enough cake batter for either two mini square 8 to 9 layer cakes or three mini square 5 to 6 layer cakes. If you want to make a typical round cake, you can totally do that. To make one normal-sized cake, use 8 or 9-inch pans, dividing the batter equally into as many layers as you like (six layers would work well).
The process of making, baking, and assembling your cake is the same no matter what size cake you’re making.
You can also make and colour your batter, then layer it in reusable baking cups for adorable rainbow cupcakes. Or even try making a swirl cake!
Organic flour & sugar vs. conventional
Before we dive into the cake ingredients, we should discuss flour types.
Organic flour and sugar are unbleached and darker than conventional flour and sugar. Conventional products are processed differently and usually bleached crystal white. The darker your batter is, the less it’ll take on natural food dye, which begs the question – should you use conventional flour and sugar instead or organic flour and sugar if you want a really white cake?

To see if it really makes a difference, I tested it out. I made one naturally coloured rainbow cake with conventional flour and sugar and a second rainbow cake with USDA certified organic flour and sugar.
Colour-wise, the cakes aren’t THAT different. You’ll still get a white cake batter if you go organic, it’s just not quite as pure white as conventional. The difference once the batter is coloured, is negligible, as you can see in the image above.
The cake made with conventional cake flour ended up with layers that were a more pastel-coloured, but also keep in mind that I took the conventional picture outside, so it’s naturally brighter AND I made the organic cake with organic whole wheat pastry flour vs. regular organic white flour (pastry flour is a bit darker).
Taste-wise, I thought the organic cake was way better, but of course, I love organics so I’m an impartial judge. Although everyone else who taste-tested the cakes (my son, roommate, and son’s friends) liked the organic cake better too.
Rainbow cake recipe ingredients
I’m using an adapted recipe for one of the best vanilla bean cake recipes I’ve tried. But really, you can make a rainbow cake with any white cake recipe you like.
- 5 large organic egg whites at room temperature
- 3/4 cup whole organic milk at room temperature
- 2 and 1/4 teaspoons pure Fair Trade, certified organic vanilla extract
- 2 and 3/4 cups organic white flour sifted (or other flour of your choice)
- 1 and 3/4 cups organic granulated sugar
- 1 tablespoon + 1 teaspoon baking powder
- 3/4 teaspoon salt
- 12 tablespoons unsalted organic butter, softened and cut into cubes
- Natural food dyes – see below
Fluffy vanilla bean frosting ingredients
You can choose any frosting you like for your cake, although I’ll point out that this frosting is REALLY good – not too thick or sweet, but just sweet enough, plus light and airy.
- 3 sticks + 2 tablespoons of organic, unsalted butter (vegan butter is a-ok to use instead, but the frosting won’t taste quite as rich)
- 2 teaspoons pure organic Fair Trade vanilla extract
- 3 cups organic powdered sugar
- 3 tablespoons organic milk (you can use cow’s milk or an alternative, such as almond milk)
- Pinch of salt – optional
- 1 organic vanilla bean – scraped – optional
Step 1: make your natural food dyes
You’ll need about 2-3 tablespoons (TBS) of homemade food dye for each cake layer. If making mini cakes you can make up to about 7 to 8 different colours per mini cake. If making a big cake, you can choose 6 to 8 colors, depending on how thick you want your layer.
To make your natural, homemade food colouring, read my tutorial: Make Natural Food Dyes for Organic Baked Goods Without a Juicer. You can make your homemade dyes up to a few days before baking your cake, if you like, or do it all on the same day.

Step 2: get your pans ready
Lightly grease the bottom and sides of your pans with a dab of organic olive oil (or whatever oil you keep around). Place cut pieces of unbleached parchment in your pans. Grease the parchment a little as well, again with organic oil. Dust the pans with flour. Set pans aside.

If you only have a few pans on hand vs. enough for all the cake layers at once, be sure to re-oil and re-parchment, oil and flour your pans for each new cake layer you bake.
Step 3: mix up the rainbow cake batter
Preheat oven to 350°F – I don’t normally preheat (to save energy) when making bread and other baked goods, but I do preheat when making most cakes.

- In a small bowl, combine and stir the egg whites, 1/4 cup of milk, and the vanilla.
- Using a larger bowl, combine all your dry ingredients together. I use an inexpensive handheld mixer for this, but you can mix by hand too.
- Add all of the butter and the other 1/2 cup of milk. Mix on low speed (or by hand) until just moistened. Increase your mixing speed and mix for about 2 minutes.
- Scrape the sides of the bowl to make sure everything is mixed well.
- Add your egg mixture in THREE separate batches, beating on medium speed for 20 seconds after each addition.

Step 4: the colour of the rainbow cake batter
Gather up all the food dyes you made during step 1. Grab some bowls and a spatula.
Divide your batter into equal parts. For this recipe, I suggest scooping out 3/4 cup of cake batter per layer (for a mini square cake). This will give you about 8 or 9 long layers of cake.
The amount of colour you add to your batter depends on what size cake you’re making and how much batter you’re using per layer. In general, the following rules apply…
- Use about 1/4 cup (4 tablespoons) of food dye to colour 2 cups of batter.
- Use about 2-3 tablespoons of food dye to colour 1 cup of batter.
- Use about 1-2 tablespoon of food dye to colour 1/2 cup of batter.
To colour your cake batter, choose a food dye, and add one tablespoon of colour to start. If the colour seems lacklustre, which it likely will be with just one TBS, add another tablespoon.
Below is typically what I use to colour one 3/4 scoop of batter, but results vary, so play around (see a full cake colour gallery here).
- Bright green – 2 tablespoons spinach juice
- Lighter green – 2 teaspoons green tea powder
- Dark pink – 1 and 1/2 tablespoons of beet puree
- Bright yellow – 1 full dropper of yellow Chocolate Craft liquid food colouring
- Peach / light yellow – 1 and 1/2 tablespoons of carrot puree
- Purple – 2 tablespoons blackberry juice
- Light pink – 1 tablespoon strawberry puree
- Violet – 1 tablespoon raspberry juice
- Dark blue – 2 and 1/2 full droppers of Chocolate Craft liquid food colouring
- Dark blue/purple – 2 tablespoons of blueberry juice
- Orange – 4 full dropper red + 1 full dropper yellow Chocolate Craft liquid food colouring
- Light blue – 1 full dropper of blue Chocolate Craft liquid food colouring
What to do with leftover food dye? Freeze leftover produce purees and juices in ice cube trays. Put the cubes in a container and save them for the next time you make homemade popsicles or smoothies.

Step 5: baking & cooling your cake
- After you colour all your batter, pour into your prepared pans and bake for 14 to 20 minutes (depending on how hot your oven runs).
- Watch the cake closely, because as soon as you can insert a toothpick and it comes out clean, it needs to come out of the oven. If it’s not done at 14 minutes, check it at 1-minute intervals.
- Let the pans cool on racks for 10 minutes.
- Loosen the sides of the cake with a small silicone spatula (so you don’t scratch your pans) and invert onto lightly greased wire racks.
- Gently turn cakes right side up.
- Cool completely.

Step 6: prep your rainbow cake for decorating (optional)
You don’t have to prep your cake for decorating, but if you do, your rainbow cake will be easier to frost.

To get started, if you’re making mini square cakes using a bread pan, cut each cake layer in half. If you’re using mini ramekins or regular cake pans, simply skip the cutting in half step and wrap your minicircle layers of cake in parchment.

Wrap each cooled cake layer in parchment paper, then freeze all the layers for a few hours. Frozen cake slices are way easier to frost because you won’t run into crumbs as much and the slices will be less soft, more solid.
Step 7: make your fluffy white vanilla bean frosting
This frosting is EXCELLENT if you like very light, creamy and not too sweet frosting. Plus, it’s easy.
- Use an electric mixer, hand mixer or big spoon to whip the butter for about 5 minutes until it becomes very pale and creamy.
- Add all your remaining ingredients and mix on low speed for 1 minute, then on medium speed for 6 minutes. The end result is super light, creamy and fluffy frosting.
This is best used right away, but it actually maintains its airy quality well over a few days (your cake likely won’t last that long though). If you like, you can use some of your natural food dyes to colour your frosting or leave it white.
Step 8: assemble and frost your rainbow cake
Guess who you shouldn’t trust to teach you how to decorate a cake? Yup, me. I’m a good baker, but my cake decorating skills are seriously lacking. Frosting and me, well, we don’t get along so great… In any case, below are the best tips I’ve got for you.

Once your cake is well frozen (step 6 above), unwrap enough cake slices for one mini cake. You should have a good pile of cake layers ready to go, as shown above.
Arrange the cake layers in a stack. You can play around to see which colour order the layers look good in before you start frosting.

To frost, place your first layer of cake on a platter or flat surface.
TIP: If you frost your cake on parchment, it will keep frosting from getting all over your cake platter. After you’re done, you can carefully slide the parchment out from under the cake.
Plop some frosting onto the first cake layer. Spread the frosting out to the edges of the cake, place the next slice on, and go from there until your cake is as tall as you like.

If you make a round cake, you likely won’t have to trim the sides. If you make a square cake, your cake layers may not match up as well, so you can trim the sides of the cake to make the sides more even. This helps you get the frosting on better.

Now you should have a decently squared off cake to decorate…

Decorating the outside of a cake is where I start having problems. I’m just not gifted at frosting the outside of cakes. But I can offer some tips. First I plop a fair amount of frosting on the top of my cake, as shown below.

I then frost the top and sides of my cake with a very thin layer of frosting to seal in crumbs.
Then I place a lot more frosting on the top and sides and smooth it out as best as I can.

Again, I’m not a cake decorating genius. If you want some excellent cake decorating tips, read Whisk Kid’s How to Frost a Cake. This gal knows what she’s doing!
I try to follow Whisk Kid’s directions, but it’s still hard for me. Also, I don’t have a bench pastry scraper, because frankly, I’m not motivated to get one (I rarely make heavily decorated cakes).

Whisk Kid recommends one though if you want to decorate perfectly frosted cakes. Since I don’t have a bench scraper, I fold a piece of heavy paper into fourths and use the edge of that (it works okay).

Whisk Kid explains how to do corners – which I’m STILL not good at, so if I want to hide shoddy corners, I’ll use piped frosting to make a little design of frosting on the corners (as shown above). You can do this too if you like. It works really well if you’re not great with cake corners.

Step 9: serving your cake
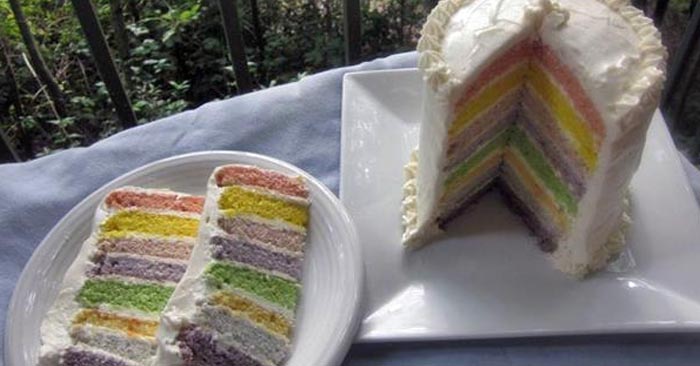
This part is easy! Make sure everyone has gathered around, then slice into your rainbow cake carefully with a sharp knife, eat and enjoy. This makes a great birthday (or another occasion) surprise cake. Whenever I slice into a rainbow cake at my house, kids (and adults) all go, “Ohhhhhh!“
One mini cake sliced thinly (it’s rich) gives you about 8 to 10 slices.

Step 10: storing your cake
This cake is best the first day, but still great for a couple of days after. To store leftovers, place in a cake holder or wrap tightly in foil and store at room temperature. This cake can be refrigerated for up to 5 days. Layers can be frozen for up to 2 months.
Hope you enjoy it. Let me know in the comments if you try it out.